How to Start a Microgreens Farm? To start a microgreens farm, select a suitable growing space with access to natural light or supplemental lighting, obtain high-quality seeds of various microgreen varieties, prepare shallow trays or containers with a growing medium such as soil or hydroponic mats, sow the seeds densely, water regularly, and harvest the microgreens when they reach the desired height for sale to restaurants, markets, or direct consumers.
Growing Your Own Superfoods: Tips for Starting a Microgreens Farm
Microgreens are young vegetable greens that are harvested just after the first leaves have developed. They are packed with nutrients and have a concentrated flavor, making them a popular choice for chefs and health-conscious individuals. Microgreens farming involves growing these tiny plants in a controlled environment, such as a greenhouse or indoor space, to ensure optimal growth and quality.
The benefits of growing microgreens are numerous. Firstly, they are incredibly nutritious, containing higher levels of vitamins, minerals, and antioxidants compared to their mature counterparts. Secondly, microgreens can be grown year-round, providing a consistent supply of fresh greens regardless of the season. Lastly, microgreens farming is relatively easy and requires minimal space and resources, making it accessible to both hobbyists and commercial growers.
The history of microgreens farming can be traced back to ancient civilizations such as the Egyptians and Persians, who used these young greens for both culinary and medicinal purposes. However, it wasn’t until the 1980s that microgreens gained popularity in the culinary world. Chefs began using them as garnishes and flavor enhancers, leading to increased demand and commercial cultivation.
Why Grow Your Own Superfoods?
Microgreens are often referred to as “superfoods” due to their high nutrient content and health benefits. Incorporating microgreens into your diet can boost your immune system, improve digestion, and support overall health. By growing your own microgreens, you have control over the quality and freshness of the produce, ensuring that you are consuming the highest quality superfoods.
Growing your own microgreens can also be cost-effective in the long run. While the initial investment may include purchasing seeds, growing containers, and other supplies, the ongoing costs are minimal. You can save money by avoiding the markup on store-bought microgreens and have a continuous supply of fresh greens at your fingertips.
In addition to personal health benefits, microgreens farming also has environmental advantages. By growing your own microgreens, you reduce the carbon footprint associated with transporting produce from farms to stores. You also have the opportunity to use sustainable growing practices, such as organic farming methods and water conservation techniques. Overall, microgreens farming allows you to contribute to a more sustainable and eco-friendly food system.
Choosing the Right Microgreens to Grow

When it comes to choosing which microgreens to grow, there are a variety of options available. Some popular microgreens varieties include broccoli, kale, radish, sunflower, and pea shoots. Each variety has its own unique flavor profile and nutritional benefits.
When selecting microgreens to grow, it’s important to consider factors such as market demand, growing conditions, and personal preference. Research your target market to determine which microgreens are in high demand and can fetch a good price. Consider the climate and growing conditions in your area to ensure that the chosen varieties will thrive. Lastly, choose microgreens that you enjoy eating yourself, as this will make the growing process more enjoyable.
| Microgreen Type | Flavor | Growth Time (Harvest) | Market Considerations |
|---|---|---|---|
| Radish | Spicy, peppery | 7-14 days | Popular, easy to grow, adds a flavor punch |
| Broccoli | Mild broccoli flavor | 7-14 days | High in nutrients, versatile |
| Sunflower | Nutty, slightly sweet | 7-14 days | Large seed size, substantial microgreens |
| Pea Shoots | Sweet, pea-like flavor | 10-14 days | Delicate texture, popular in salads and garnishes |
| Arugula | Spicy, peppery | 7-12 days | Fast-growing, adds a bold flavor |
| Kale | Mild, earthy kale flavor | 7-14 days | High in nutrients, trendy microgreen |
| Mustard | Spicy, varies by variety | 7-10 days | Fast-growing, diverse flavor profiles |
| Basil | Sweet basil flavor | 10-14 days | Popular herb, adds fragrance and flavor |
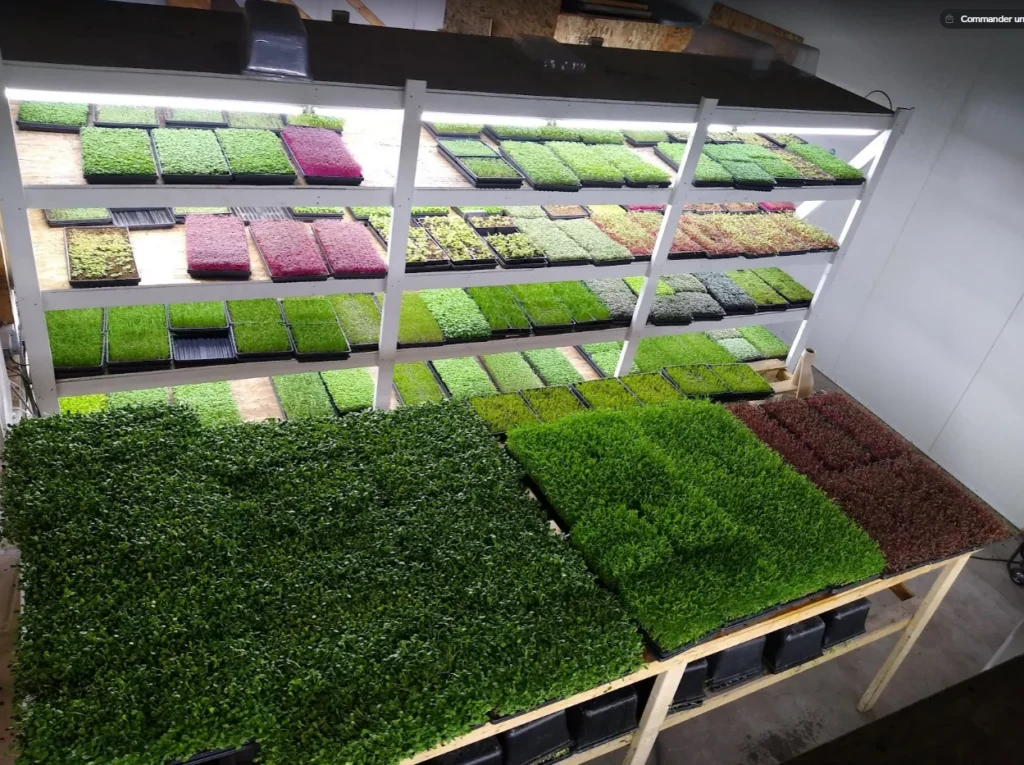
Preparing Your Growing Space
Microgreens can be grown both indoors and outdoors, depending on your available space and climate. Indoor microgreens farming allows for year-round cultivation and provides more control over growing conditions. Outdoor farming is suitable for those with ample garden space and favorable weather conditions.
When setting up your growing space, it’s important to choose the right containers for your microgreens. Options include trays, shallow pots, or specialized microgreens trays with drainage holes. Ensure that the containers are clean and sterilized before planting to prevent the growth of mold or bacteria.
To optimize growth, provide adequate lighting for your microgreens. If growing indoors, consider using artificial grow lights or placing your trays near a sunny window. Outdoors, choose a location that receives at least 4-6 hours of direct sunlight per day.
Understanding Soil and Nutrients
Soil quality plays a crucial role in the success of microgreens farming. It provides the necessary nutrients and support for the plants to grow and thrive. When choosing soil for your microgreens, opt for a high-quality potting mix that is well-draining and free from contaminants.
Alternatively, you can create your own soil mix by combining equal parts of compost, peat moss, and vermiculite or perlite. This homemade mix allows for better control over the nutrient content and pH levels.
In addition to soil, microgreens also require additional nutrients to support their growth. Organic fertilizers or liquid plant food can be used to provide these essential nutrients. It’s important to follow the recommended dosage and frequency of application to avoid over-fertilization, which can lead to nutrient burn or stunted growth.
Sourcing Quality Seeds and Supplies
To start your microgreens farming journey, you will need to source high-quality seeds and supplies. There are several options available for purchasing microgreens seeds and supplies.
Local garden centers or nurseries often carry a selection of microgreens seeds. This allows you to see the seeds in person and ask any questions you may have. Online retailers specializing in microgreens seeds and supplies are another convenient option. They offer a wide variety of seeds and often provide detailed information on each variety.
When choosing suppliers, consider factors such as seed quality, customer reviews, and shipping options. Look for suppliers that offer organic or non-GMO seeds if that is important to you. Read customer reviews to get an idea of the quality and germination rate of the seeds. Lastly, consider shipping options, especially if you live in a remote area or have specific delivery requirements.
Starting Your Seeds
Before planting your microgreens seeds, it’s important to soak them in water for a few hours or overnight. This helps to soften the seed coat and promote faster germination. After soaking, drain the water and spread the seeds evenly on a damp paper towel or growing medium.
Choosing the right growing medium is crucial for successful seed starting. Options include soil, coconut coir, or hydroponic mats. Soil is a popular choice as it provides nutrients and support for the seeds. Coconut coir is a sustainable alternative that retains moisture well. Hydroponic mats are another option, especially for indoor farming, as they provide a clean and sterile environment for seed germination.
Place the seeds in a warm and well-lit area to encourage germination. Maintain a consistent temperature of around 70-75°F (21-24°C) and provide adequate lighting. Within a few days, you should start to see the seeds sprouting and developing their first set of leaves.
Caring for Your Microgreens
Once your microgreens have sprouted, it’s important to provide them with proper care to ensure healthy growth. Watering is a crucial aspect of microgreens farming. It’s important to keep the growing medium consistently moist but not waterlogged. Overwatering can lead to mold or root rot, while underwatering can cause stunted growth.
Fertilizing microgreens is also important to provide them with the necessary nutrients for optimal growth. Organic liquid fertilizers or diluted fish emulsion can be applied every 7-10 days. Follow the recommended dosage on the packaging and adjust accordingly based on the growth of your microgreens.
Pests and diseases can be a common issue in microgreens farming. Aphids, fungus gnats, and damping-off disease are some of the common problems that growers may encounter. To manage pests, consider using organic pest control methods such as neem oil or insecticidal soap. Preventing diseases can be achieved by maintaining proper air circulation, avoiding overwatering, and practicing good hygiene.
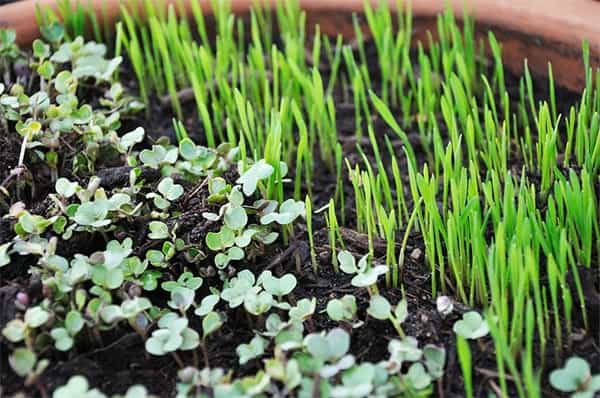
Harvesting and Storing Your Microgreens
Knowing when to harvest your microgreens is crucial to ensure the best flavor and nutritional content. Most microgreens are ready to be harvested when they have developed their first set of true leaves. This usually occurs within 7-14 days after planting, depending on the variety.
To harvest microgreens, use a clean pair of scissors or a sharp knife to cut the greens just above the soil line. Avoid pulling or uprooting the plants, as this can disturb the roots of neighboring plants. After harvesting, gently rinse the microgreens under cold water to remove any soil or debris.
Proper storage is important to maintain the freshness and quality of your microgreens. Place them in a clean container lined with a paper towel or damp cloth to absorb excess moisture. Store them in the refrigerator and consume within a few days for optimal flavor and nutritional value.
Marketing and Selling Your Microgreens
If you are considering selling your microgreens, it’s important to identify your target market and develop a marketing strategy. Research local restaurants, farmers markets, and health food stores to determine potential buyers for your microgreens. Consider their preferences, pricing expectations, and volume requirements.
When pricing your microgreens, consider factors such as production costs, market demand, and competition. It’s important to find a balance between profitability and affordability for your customers. Packaging is another important aspect of marketing your microgreens. Consider using eco-friendly packaging options that are visually appealing and practical for storage.
To successfully market and sell your microgreens, consider attending local farmers markets or setting up an online store. Utilize social media platforms to showcase your products and engage with potential customers. Building relationships with chefs and local businesses can also lead to long-term partnerships and consistent sales.
Troubleshooting Common Microgreens Issues
Microgreens farming, like any form of agriculture, can come with its fair share of challenges. Common issues include mold growth, poor germination, nutrient deficiencies, and pest infestations. It’s important to be proactive in identifying and addressing these issues to ensure the success of your microgreens.
To diagnose and address problems, it’s important to regularly inspect your microgreens for any signs of distress. Mold growth can be prevented by ensuring proper air circulation and avoiding overwatering. Poor germination can be caused by old or low-quality seeds, improper watering, or inadequate lighting. Nutrient deficiencies can be addressed by adjusting the fertilizer dosage or using a balanced organic fertilizer. Pest infestations can be managed using organic pest control methods such as neem oil or insecticidal soap.
Preventing future issues can be achieved by practicing good hygiene, maintaining proper growing conditions, and sourcing high-quality seeds and supplies. Regularly clean and sterilize your growing containers, tools, and equipment to prevent the growth of mold or bacteria. Monitor temperature, humidity, and lighting levels to ensure optimal growing conditions. Lastly, choose reputable suppliers for your seeds and supplies to minimize the risk of introducing pests or diseases.
Conclusion:
Microgreens farming is a rewarding and accessible way to grow your own superfoods. By incorporating microgreens into your diet, you can enjoy their numerous health benefits and contribute to a more sustainable food system. Choosing the right microgreens varieties, preparing your growing space, understanding soil and nutrients, sourcing quality seeds and supplies, starting your seeds, caring for your microgreens, harvesting and storing them properly, marketing and selling them effectively, and troubleshooting common issues are all important aspects of successful microgreens farming.
Whether you are a hobbyist looking to grow fresh greens for personal consumption or a commercial grower aiming to supply local restaurants and markets, microgreens farming offers a wealth of opportunities. With proper knowledge, planning, and dedication, you can embark on a fulfilling journey of growing your own superfoods and sharing them with others.
For further learning and support in microgreens farming, there are numerous resources available. Online forums and communities allow growers to connect, share experiences, and seek advice. Books and online courses provide in-depth knowledge on various aspects of microgreens farming. Local agricultural extension offices and universities may offer workshops or consultations for aspiring microgreens farmers. With the right resources and support, you can confidently start your own microgreens farming venture and reap the rewards of growing these nutrient-packed greens.
Originally posted 2024-01-17 07:16:23.