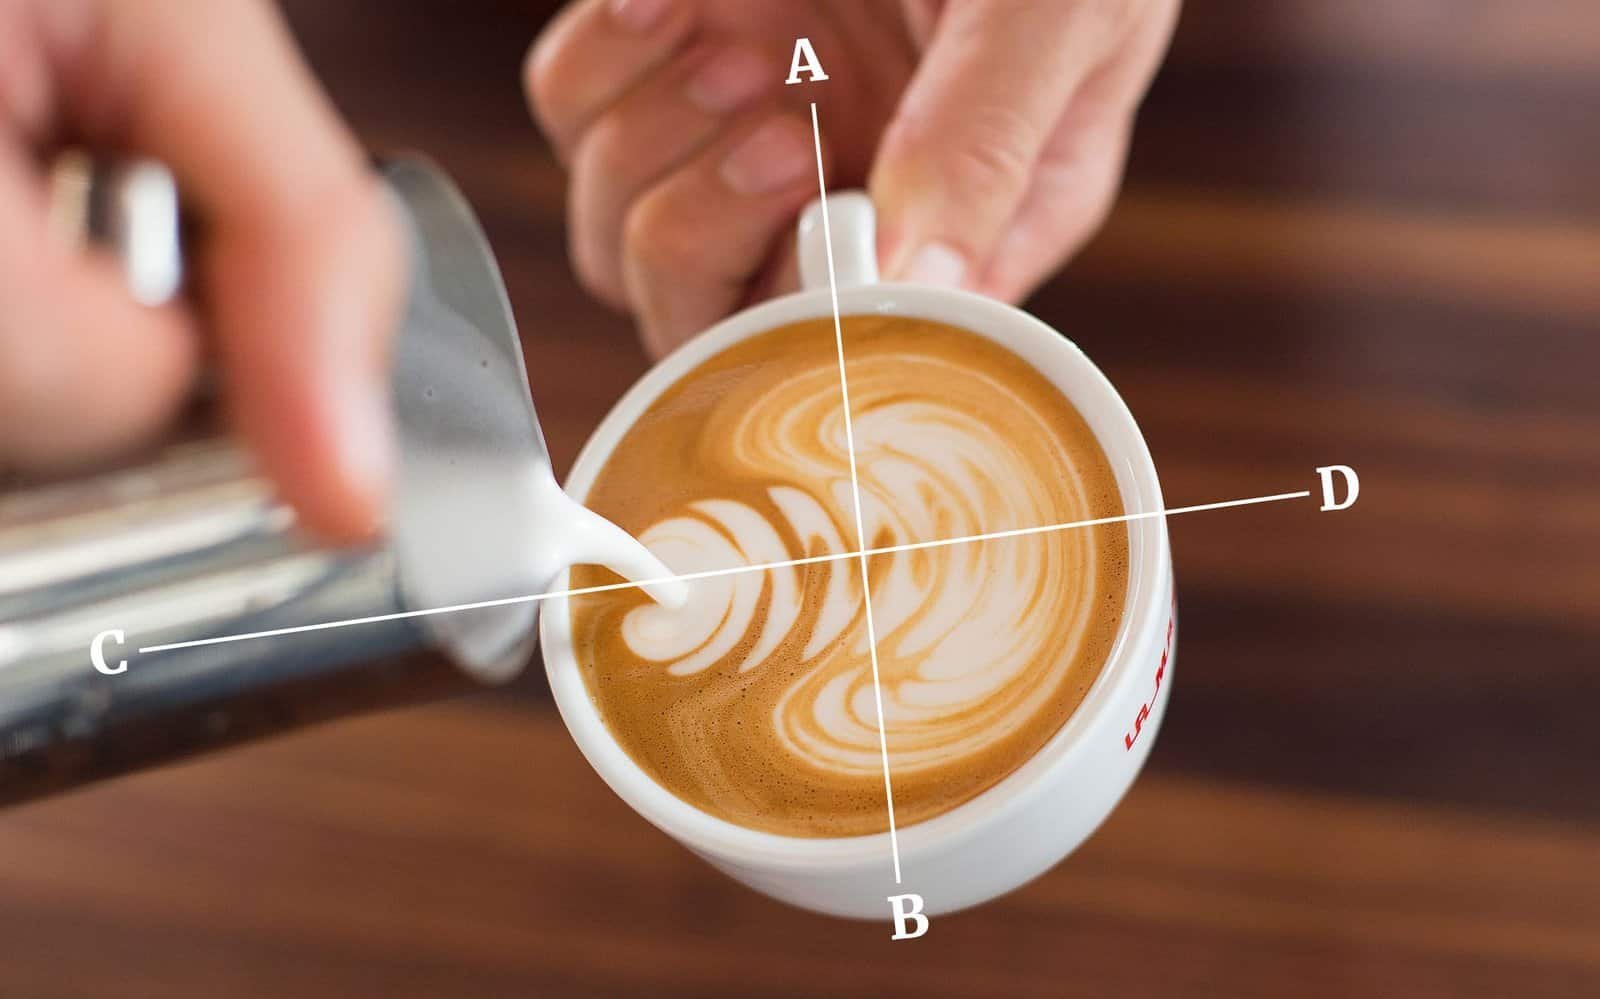
To create latte art at home, pull a double shot of espresso into a preheated cup, steam milk to a velvety texture, pour the milk slowly into the espresso at a slight angle, then use gentle wrist movements to create designs like hearts or rosettas on the surface.
From Barista to Homebrewer: Learn How to Make Hearts and Tulips in Your Latte
Latte art has become an integral part of coffee culture, with its intricate designs and beautiful patterns adorning the tops of lattes all around the world. It is not only a visual delight but also a testament to the skill and craftsmanship of the barista or homebrewer.
Mastering the art of latte making is not only important for creating visually appealing drinks but also for ensuring that the flavors are balanced and the espresso is properly extracted.
The Basics of Espresso Extraction
Properly extracting espresso is crucial for creating the perfect canvas for latte art. The extraction process involves forcing hot water through finely ground coffee beans, resulting in a concentrated shot of espresso. Several factors affect the extraction process, including grind size, tamping pressure, and water temperature.
Grind size plays a significant role in espresso extraction. If the grind is too fine, the water will struggle to pass through, resulting in an over-extracted and bitter shot. On the other hand, if the grind is too coarse, the water will pass through too quickly, resulting in an under-extracted and weak shot. Finding the right grind size is essential for achieving a balanced and flavorful espresso.
Tamping pressure is another critical factor in espresso extraction. Tamping refers to the process of evenly compressing the coffee grounds in the portafilter before brewing. If the tamping pressure is too light, water will flow through too quickly, resulting in an under-extracted shot. Conversely, if the tamping pressure is too heavy, water will struggle to pass through, resulting in an over-extracted shot. Consistency in tamping pressure is key to achieving a well-extracted espresso.
Choosing the Right Milk for Latte Art
Choosing the right milk is essential for creating latte art that not only looks beautiful but also tastes delicious. Whole milk is commonly used for latte art due to its higher fat content, which creates a creamy and velvety texture. The fat in the milk helps to stabilize the foam and create a smooth canvas for latte art designs.
However, for those who are lactose intolerant or prefer non-dairy alternatives, there are several options available. Non-dairy milks such as almond milk, soy milk, and oat milk can also be used for latte art. These alternatives may require some experimentation to achieve the desired texture and consistency, as they do not contain the same amount of fat as whole milk.
Regardless of the type of milk chosen, it is important to use high-quality milk for best results. Fresh milk that has not been sitting in the refrigerator for too long will produce better foam and result in a more enjoyable latte art experience.
Frothing Milk: Tips and Techniques
Frothing milk is a crucial step in creating latte art. There are several methods for frothing milk, including using a steam wand on an espresso machine or using a handheld frother. Each method has its own advantages and techniques.
Using a steam wand on an espresso machine is the most common method for frothing milk. It allows for precise control over the temperature and texture of the milk. To froth milk using a steam wand, start by submerging the wand just below the surface of the milk and turning on the steam. As the milk begins to heat up, gradually lower the wand deeper into the pitcher to create more foam. Once the desired temperature is reached, turn off the steam and wipe the wand clean.
A handheld frother is another option for frothing milk at home. This device works by rapidly spinning a whisk-like attachment in the milk to create foam. To use a handheld frother, simply immerse the whisk attachment into the milk and turn on the device. Move the frother up and down in a circular motion to create foam. Once the desired texture is achieved, turn off the frother and remove it from the milk.
Creating the Perfect Microfoam
Microfoam is the key to creating latte art. It refers to the velvety texture of the milk foam that is poured into the espresso. Achieving the perfect microfoam requires attention to detail and proper technique.
To achieve the perfect microfoam, start by using cold milk. Cold milk creates a better texture and allows for more control during the frothing process. It is also important to purge any excess water from the steam wand before frothing, as this can affect the texture of the foam.
When frothing the milk, it is important to keep the steam wand just below the surface of the milk to create a whirlpool effect. This helps to incorporate air into the milk and create a creamy texture. Avoid creating large bubbles by keeping the wand at an angle and moving it in a circular motion.
Understanding the Pouring Technique
Proper pouring technique is essential for creating latte art designs. The way in which the milk is poured into the espresso can determine whether a design will be successful or not.
There are several pouring techniques used in latte art, including the heart and tulip. The heart is one of the most basic designs and involves pouring a stream of milk into the center of the espresso, followed by a quick flick of the wrist to create a heart shape. The tulip design is slightly more advanced and involves pouring a stream of milk into the center of the espresso, followed by a back-and-forth motion to create petals.
To achieve a successful pour, it is important to pour slowly and steadily, allowing the milk to flow smoothly into the espresso. Avoid pouring too quickly or forcefully, as this can disrupt the design and create unwanted splashes.
Making a Heart: Step-by-Step Guide
Creating a heart latte art design is a great way to start practicing latte art. Here is a step-by-step guide to creating a heart:
1. Start by preparing a shot of espresso in a cup.
2. Froth the milk using your preferred method until you achieve the desired texture and temperature.
3. Hold the pitcher of milk slightly above the cup of espresso and pour a steady stream of milk into the center of the cup.
4. Once the cup is about halfway full, quickly flick your wrist to create a heart shape on the surface of the drink.
5. Continue pouring until the cup is almost full, then slowly raise the pitcher to create a thin line through the center of the heart.
Making a Tulip: Step-by-Step Guide
Once you have mastered the heart design, you can move on to more advanced designs such as the tulip. Here is a step-by-step guide to creating a tulip:
1. Start by preparing a shot of espresso in a cup.
2. Froth the milk using your preferred method until you achieve the desired texture and temperature.
3. Hold the pitcher of milk slightly above the cup of espresso and pour a steady stream of milk into the center of the cup.
4. Once the cup is about halfway full, move the pitcher back and forth in a zigzag motion to create petals.
5. Continue pouring until the cup is almost full, then slowly raise the pitcher to create a thin line through the center of the tulip.
Troubleshooting Common Latte Art Mistakes
Creating latte art can be challenging, and it is common to make mistakes along the way. Here are some common mistakes and tips for troubleshooting them:
1. Improper milk texture: If your milk foam is too bubbly or lacks texture, try adjusting your frothing technique. Make sure to keep the steam wand just below the surface of the milk and create a whirlpool effect to incorporate air into the milk.
2. Improper pouring technique: If your latte art designs are not turning out as expected, practice your pouring technique. Pour slowly and steadily, allowing the milk to flow smoothly into the espresso. Avoid pouring too quickly or forcefully, as this can disrupt the design.
3. Inconsistent espresso extraction: If your espresso shots are not properly extracted, it can affect the overall taste and appearance of your latte art. Make sure to use the correct grind size and tamping pressure to achieve a balanced and flavorful shot.
Tips for Practicing Latte Art at Home
Practicing latte art at home can be a fun and rewarding experience. Here are some tips for homebrewers looking to improve their latte art skills:
1. Invest in a milk frother: If you don’t have an espresso machine with a steam wand, a milk frother can be a great alternative for frothing milk at home. It allows for more control over the texture and temperature of the milk.
2. Practice with food coloring: If you want to experiment with different colors in your latte art, try using food coloring. Add a few drops of food coloring to your milk before frothing to create vibrant designs.
3. Watch tutorials and seek feedback: There are plenty of online tutorials and resources available for learning latte art techniques. Watch videos and read articles to learn new tips and tricks. Don’t be afraid to seek feedback from others to help improve your skills.
Mastering Latte Art as a Homebrewer
Mastering latte art as a homebrewer takes time, practice, and patience. It is not only about creating visually appealing designs but also about understanding the science behind espresso extraction and milk frothing.
By mastering these techniques and experimenting with different pouring techniques, homebrewers can create beautiful and delicious latte art designs that rival those found in coffee shops.
So, grab your milk frother or espresso machine and start practicing. With dedication and practice, you’ll be creating latte art masterpieces in no time.
Originally posted 2024-02-29 02:46:46.


