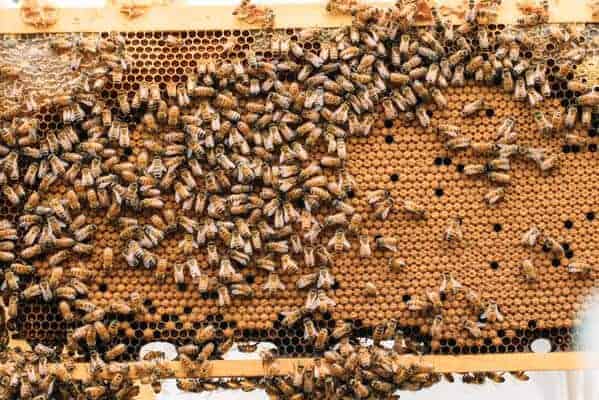
Once your colony has gotten established, your first brood inspection is an exciting milestone in becoming a beekeeper (time for some backyard honey). Here’s what to look out for:
- The brood box is usually the bottom box of a hive, it contains the developing larvae and pupae, thousands of worker bees and a queen laying up to two thousand eggs a day.
- It’s important to inspect to make sure that your brood nest is healthy and free from diseases and pests.
- How often you inspect the brood nest will depend on local conditions. It’s good to get advice on this point from local beekeepers.
- The best time to inspect is mid-morning to mid-afternoon, on a warm dry day if possible. It’s usually a bad idea to open your hive if it’s raining.
- You’ll need your bee suit, gloves, hive tool, and smoker. Make sure you’ve read up on beekeeping safety!
BROOD INSPECTION INSTRUCTIONS:
- Ensure your beesuit is properly secured.
- Blow a few puffs of smoke into the hive and leave the smoker close to the entrance.
- Move slowly and calmly when working at the hive. Listen to the bees for signs of unrest, and if they seem to get very agitated or aggressive you should calmly close up the hive and leave them alone.
- Lift the lid off (unscrew the locking wingnuts if using a Flow Hive
- Remove the inner cover using the hive tool.
- Check the inner cover for the queen, then lean the cover against the hive entrance.
- Remove the honey super if you are using one (for your first inspection, you shouldn’t have added the super yet).
- The brood nest usually contains honey at the edges, pollen and drone brood next, with worker brood concentrated in the central frames.
- Choose a frame that looks easy to lift, remove any burr comb using your hive tool, then gently lift the frame out of the hive using the hive tool.
- Don’t tilt foundationless frames when inspecting them.
What to look for:
- Food – pollen and nectar stores, bee bread and capped honey.


- Eggs, larvae, brood and a regular, non-spotty brood pattern. To see eggs you will have to tilt the frame to the light just right!


- Disease, pests or signs of stress.

A small number of these are not cause for alarm, but if you see significant numbers of them you may need to take action.
- Space – there should be enough space between frames, but not too much. The brood frames should be packed together tightly towards the center of the box.
- Queen – she has a longer abdomen than the workers. If you don’t see her but can see eggs then you can be pretty confident that the queen is present.

- When putting the first frame down, lean it against the hive so that if the queen happens to be on it she can crawl straight back into the hive.
- When replacing the frames, put them back in the same order you removed them so as to maintain the layout/structure that the bees have built.
- Replace the inner cover, followed by the inner cover / crown board and finally the roof.
Brood Inspection’s Checklist
The most important points to remember during a brood inspection are:
- Wear a beesuit and gloves, and be aware of beekeeping safety guidelines.
- Use the smoker to calm the bees before opening the hive, and throughout the inspection as necessary.
- Use the hive tool to remove any burr comb that is joining frames together, and gently prise the frames out of the hive.
- Be careful if using foundationless frames – the comb can be fragile.
- Check for food stores – pollen, honey, nectar and bee bread.
- Check for eggs and young larvae – this will show that your queen is laying.
- An extra light source such as a flashlight can be helpful when looking for eggs.
- Take photographs of anything you would like to check up on later.
- Check for signs of pests and disease.
- The brood pattern should be consistent and not spotty.
- When replacing the frames, put them back in the same order as you removed them.
We are sure that you are pretty excited to check your brood box for the first time ever. We hope that the information in this post will help your beekeeping!
Originally posted 2020-05-09 19:27:36.


